A quick-glance at the main requirements
General guidance
- Use nutritionLESS soil, e.g. peat moss and/or live sphagnum moss + aeration additives such as quartz sand or perlite (well rinsed wwith rainwater)
- Soil needs to be moistened first
- Never water with tap water, only rainwater, distilled, or reverse osmosis water
- If you’re going to place the plants under the sun, do it gradually.
- VFTs require a dormancy period
- VFTs require as much sunlight as possible, either artificial or natural sunlight
![]() -> This icon means it’s a comment of someone online, not mine
-> This icon means it’s a comment of someone online, not mine
Did you just receive a new plant?
When you receive a new plant, it is often the case that the conditions you provide are not the same as where the plant lived until it got to you, so this shock could potentially slow down and even sometimes kill the plant. So avoid repotting in the first few weeks and just let the plant acclimate to its new conditions. For certain species, like Heliamphora and Cephalotus, I also keep them with a plastic cover, a dome, or just foil for a few weeks, and by adding a little hole, then two and so on, I gradually reduce the humidity to that of their surroundings. This helps you not shock the plant too much at the beginning, giving it a higher chance of survival. I would also take a few leaf cuttings as soon as I get a new plant to make sure I have more of them if the mother plant does not do well. Sometimes I even write back to the store where I got the plant to ask what conditions the plant was living in, so I can try to match this if possible.
Water
Due to the naturally poor soil, carnivorous plants also require pure water, such as rain, distilled or reverse osmosis (RO) water, with rain water being the best choice, generally speaking. However, if you have no means of collecting the rainwater, you can use any of the other 2 options. You can measure if the water is suitable for your plants with a TDS meter. Some people are very lucky to have pure and clean tap water, but do make sure to use TDS meter before using it. The value measured should be below 100 PPM (parts per million).

Soil
Soil moisture
With carnivorous plants the soil must always be moist, so it’s recommended that your plants sit in a dish and always have some water in the dish. What I tend to do, to give them a bit of a break, is I wait till the water evaporates from the dish, wait one day, this lets the soil dry a bit and then i add water again. Always bottom watering – inside the dish
 Get a Moisture meter until you train your eye of how the soil should look in terms of moisture
- For a quick fix of acidity of the soil, water plants several times with a solution of 2 tablespoons of vinegar to a gallon (~3L) of water. This is a great way to adjust pH in container plants.
Soil mixtures
The main thing is that the soil needs to be poor in nutrients and acidic. This is achieved through using things like peat moss which grows in bogs. The natural habitat of most carnivorous plants is bogs and swamps.
- Peat moss : perlite -> ratio 50:50 for better aeration and/or bigger plants or 75:25 for smaller plants (perlite tends to collect on top of the soil
- Peat moss : sand -> ratio 50:50 or 75:25
- IMPORTANT: Buy only quartz sand AND make sure to wash it several times before mixing it to remove all buildup on it
- Live sphagnum moss 100% – tends to dry quick, so always keep in a deep dish with water. Also tends to grow a lot if in optimal conditions, so it’s not suitable for tiny plants or seedlings
- Live sphagnum moss : perlite -> ratio 50:50, good for big plants like sarracenias, nepenthes etc
Sphagnum / Peat moss – always read the packaging and make sure it says NO FERTILIZER and that it’s 100% natural and pure
Safe top layer options:
- Carpet moss
- Live sphagnum moss
Feeding
Since your plants will live in nutrient-poor soil AND get pure water, they need nutrients from elsewhere. Normally, if you keep the plants outdoors year-round, they will be able to catch bugs naturally. However, for indoor plant,s that’s not always the case, so you may need to supplement their diet a bit, here’s what you can use:
- Freeze-dried bloodworms – take some out in a little bowl, add a few drops of water, mix well. Pick a bit of the mixture, dry it on a piece of kitchen towel to remove as much as possible from the water and place it in one to two traps per plant, for Venus FlyTraps, and for plants like pinguicula and drosera, you can soak the worms a bit loner with a bit more water and worms and with pippette to put a drop of the bloodorm water on 1-2 laves per plant.
Although it sounds a bit contradictory, you CAN apply fertilizer but there are only certain things in the community that have been tested and proven to work, BUT this is a big disclaimer: be very careful and this is just information dump here, not an advice, your decide what do you yourself. I take no repsonsibility if any of your plants die as a result of trying it..
On the use of:
- MAXSEA Seaweed Brand Plant Food used at the rate of 1teaspoon/Gallon.
![]() After several Months of usage on Dionaea and Pings, I can definately say that the MAXSEA is an EXCELLENT FOLIAR spray used at no more than half the recommended dosage and not used more than twice a month. Once a Month seems more than enough. You will see a difference almost immediately (a few Days). They perk right up. Foliar feeding means one quick spray; no drippings into the media.
After several Months of usage on Dionaea and Pings, I can definately say that the MAXSEA is an EXCELLENT FOLIAR spray used at no more than half the recommended dosage and not used more than twice a month. Once a Month seems more than enough. You will see a difference almost immediately (a few Days). They perk right up. Foliar feeding means one quick spray; no drippings into the media.
Light
Artificial
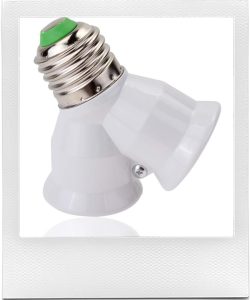
I use multiple bulbs setup on a shelf i got from Ikea. The bulbs are special, called “Daylight” bulbs with a temperature of the light at 6500K (very important), 26 to 29 watts. As for the light intensity, look for the highest lumens as possible, for example 1450 lumens is a good choice. This means the bulb will be brighter. The fittings for my bulbs right now are regular e27 bulb fittings and I use bulb splitters to get 4 bulbs on each shelf above my plants.
So a quick overview of bulb parameters to look for:
- Light colour: 6500K (range) = Daylight
- Lumens output: ~ 1450Lm
- Colour code: 865
- Bulb plug: E27 (regular light bulb plug)
- Watts: 23-27W (the less the wattage, the smaller the bill)
—-
Several options (from dutch website):
- Philips-pl-electronic-27w-865-e27-master-daylight: 6500K | 1700Lm | LENGTH: 17.4cm
- Philips-tornado-spiral-23w-865-e27: 6500K | 1400Lm | LENGTH: 11.9cm
—-

- daylight bulbs will get your plants to grow very well but they will not colour great, for colouring, you need to add purple or red light, in which case it’s good to have some sort of diode bulb like above.
- having a lot of these energy saving bulbs really doesn’t add a lot more energy consumption, in fact it’s quite good for your budget too.
Articles:
-
- Article about indoor artificial lights https://plantcaretoday.com/growing-plants-indoors-artificial-light.html
For colouring and flowering
- Light colour/Lichtkleur: 2700K (range)
- Lumens output: ~ 1300Lm
- Colour code (very warm colour / Zeer Warm Wit): 827
- Bulb plug: E27 (regular light bulb plug)
- Watts: 23W (the less the wattage, the smaller the bill)
Sunlight
Plants require a good amount of direct sunlight – 6-8 hours per day to grow healthy.
![]() Introducing a plant to sunlight must happen gradually. Read this article for more info: How to Move a Plant From Artificial Light to Sun Light
Introducing a plant to sunlight must happen gradually. Read this article for more info: How to Move a Plant From Artificial Light to Sun Light
Dormancy
Outdoors dormancy
If your carnivorous plants live outside and your winters are not getting too cold, like in the Netherlands – pretty mild winters with rare frosts, then you can only place a cover over your plants so it doesn’t rain on top of them (making sure there is space between the pot/plant and the cover, otherwise it will grow mold and kill your plants) and let it naturally go dormant. When carnivorous plants go dormant, their growth will slow down and eventually some or all of their traps/leaves/pitchers will go black and die off. Your plant IS ALIVE, so don’t worry about it. It will perk up in spring, it’s only sleeping. Do make sure to water occasionally, though.
If you get pretty cold winters, you may also want to protect the pots and therefore the root system from freezing, for example, by burying the pots in the soil or placing the pots in a winter box full of mulch for insulation or in a styrofoam box. What I do it cover the pots with styrofoam and place a cover on top. Even if it freezes, I know the roots are ok and my plants grow so much better if they are left outside than if i’d bring them indoors for the winter. In case you live in a very temperate climate with no winters, you might want to consider refrigerator dormancy. See the section for it below.
![]() VFTs require dormancy if you want to keep them alive. If they do not go dormant for 2-3 years in a row, they will likely die. It’s a scary thing to do – letting them go dormant outside, but once you’ve done it, it gets easier.
VFTs require dormancy if you want to keep them alive. If they do not go dormant for 2-3 years in a row, they will likely die. It’s a scary thing to do – letting them go dormant outside, but once you’ve done it, it gets easier.
SHELTER from rain and cold temperatures
Refrigerator dormancy
You have to slow the growth down by
- Introducing shorter days (with the lights)
- No feeding
- Expose them to cool temperatures
- Less moist, not too much water
When preparing for dormancy, the black traps can be trimmed, but very carefully. The traps will (almost) all turn black, but the plant will grow new ones, so no worries.
![]() Keep the plant in a dish with 1cm of water at all times while in the fridge!!
Keep the plant in a dish with 1cm of water at all times while in the fridge!!
For VFTs, I drain off excess water from the pots, hit them with a sulphur based fungicide and place in zip lock bags and pop them in the fridge for 3-4 months. Late winter around March I take them out hit them with sulphur based fungicide again and place in a south and west window until night time temps. Regularly stay above freezing then slowly acclimate them to full outdoor Sun.
- See: Dormancy options
Keeping plants at the temperature below freezing is okay if you give the plant some insulation. You can put it in a styrofoam cooler, for example.
Winter serre

Seedling dormancy
Let’s talk about hibernating small plants now. As we know, they are more vulnerable to unfriendly conditions, such as a lack of light and lower temperatures. Technically, putting them into dormancy isn’t that hard and can be beneficial, but it should be tried by more experienced growers. Beginners can skip the dormancy of small plants (up to 4-5 cm, 1,5-2 inches), without having to worry about negative effects. Seedlings can be “cheated” simply by repotting them.
Repotting
Pot types
The safest bet with pots for carnivorous plants are plastic pots. If you want to have more plants, square pots are a good choice in order to fit more pots on a single water tray. You can also use clay pots.
 DO NOT USE CLAY pots if not glazed!
- Use light colored pots, if you can. Black pots attract more sun and may make the soil too hot during hot summer days, so best to use white or a light colour.
When and how to repot?
The best time to repot is during dormancy of the plant – this is the time the plant is least disturbed and likely to die if you damage some of its roots. To remove the old soil from the roots of the plants, rinse with distilled/rain/ro water. Venus Flytrap’s roots are black, so be very careful not to damage them when repotting.
Some plants like pinguiculas have very short, shallow roots and if you gently scoop them from 3-4 cm underneath is usually enough and you can directly put the plant on top of the new soil, put a bit more soil around it, and voila, it’s done.
Drosera can have long roots, for example, binata has very deep and long roots.
It is important to be gentle on your new plants for the 1st week, because although they have been growing in sunlight, they have just been uprooted and transported, and will briefly need to adjust and acclimate to their new conditions. They do need sunshine, but gentle sunlight for the 1st week (please do not immediately place them outside in full blazing continuous direct sun) during this brief adjustment period. For the first week, gentle sunshine is needed such as a morning sunshine, outside dappled light (shade mixed with sunlight) or a south-facing windowsill. Thereafter, gradually increase the exposure of your new plant to extended periods of continuous direct sunlight. After this adjustment period, your plant will thrive on and require more sunlight (at least 3-4 hours a day minimum).
Planting seeds
Prepare the peat + sand by cleaning them with distilled water and possibly sterilizing the mixture in the microwave (see the soil sterilization section). The soil mixture for SEEDS should be boggy, i.e. well soaked in water.
When the mixture is ready, sprinkle the seeds on top of the soil. Do not bury them!
Warmth and moisture!
Your seeds are sown! Now you need to keep them warm and moist at all times until germination. There are several ways to do this. Ideally, you want to keep your seeds between 78 and 90 F (25 – 32 C). They will germinate faster if they are warmer than room temperature. Keep an eye on the surface of the soil and do not let it dry out. Spray the surface with distilled water, or you can cover the top with some clear plastic to increase the humidity. Fresh air flow is still important, so make sure to remove the plastic periodically, or you will start to see mold grow on the soil. Do not cover the seeds with plastic if they are ever under direct sunlight. They will easily overheat and die. Seeds don’t need any direct sunlight at all for that matter. Bright but indirect sunlight is ideal.
There is also a trick with seedlings. If you try repotting them in spring after overwintering them, it will trick them into “thinking” that they just had their dormancy. If the pot gets ALGAE, spray hydrogen peroxide to get rid of the algae without compromising the seeds. For info on how to use peroxide, see the pests section.
Article for planting seeds and conditions
Soil sterilization
Sterilization is something I do when i plant new seeds to prevent anything growing inside the soil as often there are seeds and whatnot inside the peat moss. So to give a head start to my seeds, I would sterilize the soil. For this purpose, you need a plastic microwave-safe container, put inside the potting mixture of your choice. Water thoroughly and put the lid on, but not completely closed. Put it in the microwave and let it run for 5 min. Let the soil cool off before placing your seeds inside.
Pests & Fungus
Natural prevention against pests is Neem Oil. Should be used before you are fully infested with bugs, so as soon as you notice pests, then you start using it, not when you have a real problem, because neem is natural and will not kill but would prevent spread if not too late.
- How to use Neem: Two Tablespoons of neem oil per gallon (3.8 litres). Add a drop of dish soap to get it to mix. About 7mL for a 32-oz (950 ml) spray bottle.
Orthene PCO Pellets Commercial Insecticide is what people write online that they use.
- I have not tried Orthene myself, so proceed with caution.
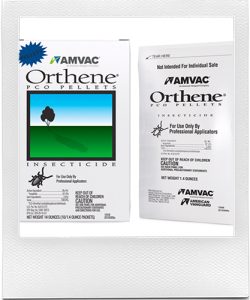
Below are some comments from people who tried it.
Look for pesticides with an active ingredient being one of the following 2:
- Imidacloprid
- Permethrin – lethal for cats
- if it has POTASSIUM SALTS, DON’T BUY IT
Fungicides
- Use Sulfur-based fungicides for flytraps and NOT copper-based ones.
Example products:
- Bonide Sulfur Plant Fungicide is a finely ground wettable powder containing 90% elemental sulfur. Controls diseases on fruits, vegetables and flowers. Effective against powdery mildew, rust, scab, brown rot, rose black spot and many more. Works on pest mites, too! Will not burn plants.
- Hydrogen Peroxide to kill algae and fungus
![]() The live sphagnum moss will die with the hydrogen peroxide.
The live sphagnum moss will die with the hydrogen peroxide.
https://www.wikihow.com/Use-Hydrogen-Peroxide-in-the-Garden
![]() How Hydrogen Peroxide prevents root rot/over watering.
How Hydrogen Peroxide prevents root rot/over watering.
When plants are watered with H2O2, it will break down and release Oxygen into the area around the roots. This helps stop the Oxygen from being depleted in the water-filled air spaces until air can get back into them. High Oxygen levels at the roots will encourage rapid, healthy root growth. In a Hydroponic system, H2O2 will disperse throughout the system and raise Oxygen levels as it breaks down. Strong white healthy roots with lots of fuzzy new growth will be visible. This fuzzy growth has a massive surface area, allowing for rapid absorption of the huge amounts of water and nutrients needed for rapid top growth. A healthy plant starts with a healthy root system.
Pollination
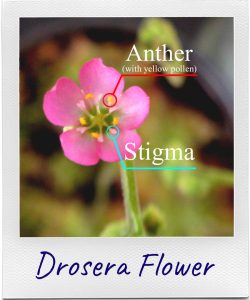
First, an anatomy lesson of a few plant flowers
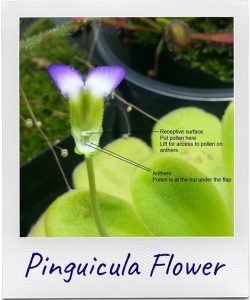

- Letting your plant flower, means a lot of energy is put into the growth of that flower, which will/may make your plant die, especially if it is a young plant, so i’d suggest to leave one flower at most and cut the rest as soon as they start emerging and for young plants – trim all the flowers and let the plant use its energy to grow traps and roots instead.
One flower stalk will have multiple flowers on it, and they come up one after another, not at the same time. The same is valid for when they are ready to pollinate and when they die off. Once the flower has pollen on its anthers, collect some with the brush (the powder should be visible on the brush) and gently spread the pollen on the stigma of the same or another flower. Do that a few times: VIDEO. If it’s too early in the development of the flower, it may not have pollen yet, or if it’s too late, the stigma may be black. I’d still add pollen on the black stigma, but i don’t guarantee if it will work.
If the pollination was successful, you will see how the flower base starts growing bigger and bigger. You can most clearly see that by comparing a successful and an unsuccessful flower. So it takes some practice.