Status: WIP
Every time i change a job or somehow get a new laptop it;s the same drill all over again – setting up my environment in order to make dev work faster, easier and more intuitive. My main tools are the terminal and an IDE, most of the time. Also, of course, the generqal setup on the Macbook i do as well (I will list that below as well, although it may be useless)
Terminal setup
iTerm2
iTerm2 is a terminal for Macbook that is super useful, you can split screen vertically and horizontally to create as many nested terminals as you need and this way you can see both your app client and server, or k8s clusters etc at the same time. Super useful. A bit heavy though.
https://iterm2.com/downloads.html
zshell
zShell is my favourite customizable shell to replace the standard bash terminal on macos. You can see which cloud environment or k8s clusters you are in, which python environment you run in, customise your colours, themes and so much more.
sh -c "$(curl -fsSL https://raw.githubusercontent.com/ohmyzsh/ohmyzsh/master/tools/install.sh)"
With that, I suggest using the PowerLevel10K theme, super easy to install and configure. After installing,
Open ~/.zshrc, find the line that sets ZSH_THEME, and change its value to "powerlevel10k/powerlevel10k"
configure it with:
p10k configure
Later on, you can open ~/.p10k and update colours with colour codes from the image below. I also suggest checking the POWERLEVEL9K_LEFT_PROMPT_ELEMENTS and POWERLEVEL9K_RIGHT_PROMPT_ELEMENTSas well as the Line #2 right after, in order to customize what goes on the left and right of your prompt, super cool things there!
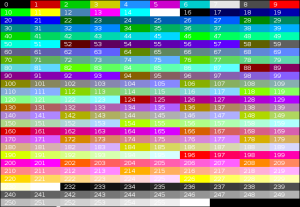
You can also print all the colours in your terminal with
for i in {0..255}; do print -Pn “%K{$i} %k%F{$i}${(l:3::0:)i}%f “ ${${(M)$((i%6)):#3}:+$’\n’}; done
zshell autocompletion
To enable autocomplete and suggestions for commnds you run, there’s a super useful plug in for that. Run the following:
mkdir ~/.zshell_autocomplete && git clone https://github.com/marlonrichert/zsh-autocomplete.git ~/.zshell_autocomplete
Then, add the following at the top of your ~/.zshrc file and look up for references of compinit and comment them out:
source ~/.zshell_autocomplete/zsh-autocomplete.plugin.zsh
vim
Setting up vim with colour coding, for example, comes in VERY useful if you have to modify configs etc on a daily basis. I create a ~/.vimrc file and add all my settings inside of it, check out below my content:
set number             # set line numbers on or off

set ignorecase

set smartcase

syntax enable

set tabstop=4          # set indentation to 4 spaces

set autoindent         # automatically indent with the same nr of tabs like the line above

set cursorline

set title              # show current file name, being modified

set history=1000       # set undo limit to 1000

#set spell              # ednable spell check
Git tips & tricks
aliases
I like setting up useful aliases to speed up my git experience, below are my most useful ones
git config --global alias.cob "checkout -b"

git config --global alias.st "status"

git config --global alias.co "checkout"

git config --global alias.cm "commit"

git config --global alias.po "push origin"

git config --global alias.reset "reset --soft HEAD~;"        # reset committed changes which are NOT pushed yet
And let’s configure a tool to check the latest commits and get some useful info:
git for-each-ref --sort=-committerdate refs/heads/ refs/remotes --format='%(authordate:short) %(color:yellow)%(objectname:short) %(color:blue)%(refname:short)%(color:reset) | %(color:green)%(committerdate:relative)%(color:reset) => by%(color:red) %(committername)'
multipull
Pull multiple repos at once from the parent directory instead of pulling them one by one
alias multipull="find . -mindepth 1 -maxdepth 1 -type d -print -exec git -C {} pull \;"
————————————————
git browse
When you type git browse in the terminal from a repo, it opens the repo in your browser
-
-
the script originates from HERE, the file name is git-browse: Original article
-
Instructions:
Create a new file:
mkdir ~/.gitbin; touch ~/.gitbin/git-browse
NB!: The file name must start with git.
vi ~/.gitbin/git-browse
Then press i to insert and paste the content of the git browse file.
-
press Escape and type `:wq`
-
Add this to
~/.bashrcor~/.zshrcfile:
export PATH=”$HOME/.gitbin:$PATH”
run
chmod +x ~/.gitbin/git-browse
-
In a repo, run
git browse originand it will open in the browser.
——–
Python setup
Virtual environment
You should always use virtual environment for your applicaitons. It does not only prevent you from installing and cluttering your machine with packages you may never even use again besides this one time you need it for a small POC project, but also you can install different versions accoridng to your needs. Virtual environments allow you to have sort of a local “apps” folder with its own versions and packages for application 1 and other version or packages for application 2, you can easily destroy and re-create them in seconds time.
Virtualenv
Pipenv
UV
Makefile
What are some of your setup choices and tips and tricks? I would absolutely love to read and try them!